The first time I installed a dissolved ozone sensor on a water treatment system, I made what turned out to be a very common mistake: I ran about two meters of PVC tubing from the contact chamber outlet to the sensor flow cell. The readings looked great for about a week. Then the operator called and said the numbers didn’t match his DPD colorimetric tests anymore. The sensor was reading 30% low.
The problem wasn’t the sensor. It was the PVC tubing. Ozone attacks PVC. Within days, the inner wall of that tubing was degrading, consuming ozone before it ever reached the probe. We switched to PTFE tubing, recalibrated, and the readings snapped right back into agreement with the bench tests.
That experience taught me something about dissolved ozone that separates it from almost every other water quality parameter: the installation matters as much as the sensor itself. You can buy the most accurate ozone probe on the market, but if your sample delivery system is eating the ozone before it reaches the electrode, your readings are fiction.
This guide covers everything we’ve learned about setting up and running the O3-100 dissolved ozone sensor in the field. Not the theory of ozone measurement (we cover that in our dissolved ozone monitoring guide), but the hands-on, practical side: how to wire it, where to mount it, how to calibrate it, and what to watch out for in different applications.
What the O3-100 Actually Is
The O3-100 is an electrochemical dissolved ozone probe with integrated electronics and a digital RS485 Modbus RTU output. Unlike analog sensors that need a separate transmitter to convert the signal, the O3-100 handles all the signal processing internally. You get a digital ozone reading directly from the sensor, ready to feed into a PLC, SCADA system, or IoT controller.
Here’s what matters from the spec sheet:
| Parameter | Value |
|---|---|
| O3 Range | 0.00 to 20.00 mg/L |
| Resolution | 0.01 mg/L |
| Accuracy | ±0.02 mg/L |
| Temperature Range | 0 to 70°C |
| Temp Compensation | Automatic (TH10K thermistor) or manual |
| Pressure Rating | 0 to 6 bar, IP68 submersible |
| Power Supply | 12 to 24V DC, ≤0.5W |
| Output | RS485 Modbus RTU |
| Housing | Glass + PP + POM |
| Mounting Thread | PG13.5 |
| Cable Length | 5 meters |
| Electrode Lifespan | ~12 months typical |
| Calibration Interval | ~3 months typical |
A few things stand out here. The 0.01 mg/L resolution is important for aquaculture, where the difference between 0.01 and 0.05 mg/L of residual ozone is the difference between safe water and fish with damaged gills. The 0 to 6 bar pressure rating means it works in pressurized contact vessels, not just open tanks. And the 0 to 70°C temperature range with automatic compensation covers everything from chilled drinking water lines to warm industrial process streams.
The reference system uses a dual salt-bridge with an eco-friendly liquid junction. This design resists contamination from the process water better than single-junction references, which is relevant when you’re measuring in water that contains chlorine, organic acids, or other compounds that could poison a conventional reference electrode.
Wiring and First Power-Up
The O3-100 comes with a 5-meter cable terminated in four bare wires. Each wire is color-coded:
| Wire Color | Function | Description |
|---|---|---|
| Red | V+ | 12 to 24V DC power supply |
| Black | GND | DC power ground |
| Green | RS485-A | Data T/R+ |
| White | RS485-B | Data T/R- |
If you’re connecting to an Omni Genesis or Omni Exodus controller, the RS485 terminals are clearly labeled and you can connect directly. For other controllers, PLCs, or USB-to-RS485 converters, just match A to A and B to B.
Communication Defaults
Out of the box, the sensor speaks Modbus RTU with these settings:
- Baud rate: 9600 bps (configurable to 1200, 2400, 4800, or 19200)
- Data bits: 8
- Parity: None
- Stop bits: 1
- Slave address: 1 (configurable from 1 to 247)
One tip that saves headaches: if you’re putting multiple sensors on the same RS485 bus (the O3-100 supports up to 32 devices per bus), change the slave address of each sensor before connecting them all together. It’s much easier to configure one sensor at a time than to sort out address conflicts on a live bus.
Reading Data via Modbus
The sensor offers two ways to read measurements: integer mode (function code 0x04) and float mode (function code 0x03).
Integer mode is simpler. Read register 0x0000 for the O3 value, then divide by 100 to get mg/L. Register 0x0008 holds temperature, divide by 10 for degrees Celsius. So a raw value of 998 at register 0x0000 means 9.98 mg/L, and 250 at register 0x0008 means 25.0°C.
Float mode gives you IEEE 754 floating point values directly. Each measurement occupies two consecutive registers. Register pair 0x0000-0x0001 holds the O3 value in mg/L, 0x0008-0x0009 holds temperature in °C.
For most integrations, integer mode is easier to work with and avoids floating point parsing on simpler controllers.
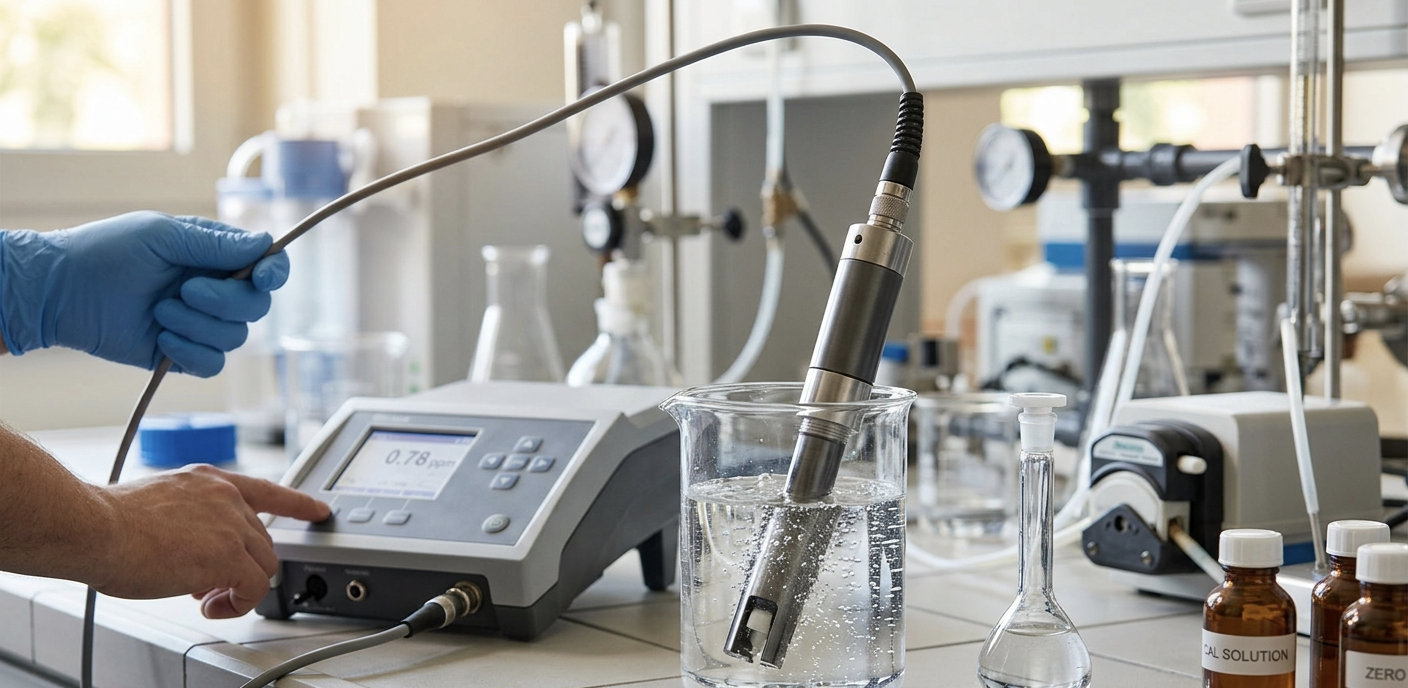
Installing the Flow Cell
This is where most installation problems happen, and it’s worth taking time to get right.
The O3-100 is designed to work with the A580 gas-tight flow cell. “Gas-tight” is the critical word here. Dissolved ozone wants to escape from water, especially at low concentrations. If you mount the sensor in an open tank or use a standard flow cell with an air gap, ozone off-gasses at the water surface and your readings will be lower than the actual concentration in your pipes.
The A580 flow cell keeps the sample under pressure as it flows past the electrode, preventing off-gassing and giving you a measurement that actually represents what’s happening in your process.
Mounting and Orientation
Mount the flow cell vertically with the water flowing upward. This prevents air bubbles from accumulating on the electrode surface. Air bubbles on the sensing element cause erratic readings and, over time, they create dry spots that lead to calibration drift.
The O3-100 threads into the flow cell via its PG13.5 mounting thread. Hand-tighten plus a quarter turn with a wrench. Don’t overtighten. The housing is glass and polymer, not stainless steel.
Sample Line Materials
This is the part where the PVC tubing story from the introduction becomes relevant. Use only ozone-compatible materials for everything between your process and the sensor:
| Material | Compatible? | Notes |
|---|---|---|
| PTFE (Teflon) | Yes | Best choice for sample tubing |
| PVDF | Yes | Good for fittings and valves |
| 316L Stainless Steel | Yes | Below 0.5 mg/L ozone. Above that, use higher alloys |
| PVC | No | Degraded by ozone. Common mistake |
| Rubber/EPDM | No | Destroyed rapidly by ozone |
| Copper | No | Reacts with ozone, contaminates sample |
| Silicone | No | Ozone-permeable, absorbs and releases O3 |
Keep the sample line as short as possible. Every extra meter means more ozone decay and more lag time between a process change and the sensor seeing it. Under 1 meter of PTFE tubing is ideal. Over 3 meters and you’re measuring the ozone that survived the trip, not the ozone in your process.
Flow Rate
Target 0.5 to 2.0 liters per minute through the flow cell. Too little flow and the sensor depletes the ozone in the stagnant layer around the electrode, reading lower than actual. Too much flow creates turbulence and microbubbles that cause noisy readings.
A simple ball valve on the inlet and a rotameter (flow indicator) on the outlet is the easiest way to set and verify flow rate. If you don’t have a rotameter, a graduated container and a stopwatch work fine during commissioning.
Calibration Step by Step
The O3-100 supports two-point calibration: slope and zero. Slope must be calibrated first.
What You Need
- A known ozone standard (freshly ozonated water with verified concentration)
- An indigo colorimetric test kit (Standard Methods 4500-O3) or a calibrated reference analyzer
- Ozone-free water (tap water that has been aerated for 24 hours, or water treated with sodium thiosulfate)
- A way to send Modbus commands (your controller software, a Modbus master tool, or a laptop with a USB-to-RS485 converter)
Slope Calibration
-
Prepare ozonated water at a known concentration. Anywhere from 1 to 10 mg/L works, but 5 mg/L is a convenient target that’s easy to verify with an indigo test kit.
-
Verify the concentration with your reference method. This is the step people skip, and it’s the step that matters most. Your calibration is only as good as your reference measurement. Take the sample, test it immediately (ozone decays in minutes), and record the value.
-
Place the sensor in the ozonated water and wait for the reading to stabilize. This takes 60 to 120 seconds. Watch the electrode signal register (0x0004 in float mode) and wait until it stops trending.
-
Send the calibration command. Write the target concentration multiplied by 100 to register 0x0043. For 5.00 mg/L, write 500 (0x01F4).
-
Read back register 0x0043 to check status. A value of 0 means calibration succeeded. If you get status 3 (signal unstable), wait longer and try again. If you get status 4 (slope out of limits), the sensor may need cleaning or the electrode may be nearing end of life.
Zero Calibration
-
Place the sensor in ozone-free water. Make sure it’s truly ozone-free. Tap water is usually fine since municipal ozone residuals decay within minutes, but if your tap water is chlorinated, let it sit uncovered for a few hours.
-
Wait for the reading to stabilize at or near zero.
-
Write 0x0001 to register 0x0043.
-
Check status the same way as slope calibration.
Verifying Calibration
After calibrating, check the calibration status register (0x0019). The values mean:
- 0x0000 = No calibration performed
- 0x0002 = Slope calibrated only
- 0x0003 = Both slope and zero calibrated
You want to see 0x0003. If you only see 0x0002, your zero calibration didn’t take. Repeat the zero step.
When to Recalibrate
The datasheet says every 3 months under typical conditions. In practice, we recalibrate when:
- Monthly spot checks with an indigo test kit show deviation greater than 10%
- The electrode signal at a known concentration has drifted significantly from the previous calibration
- The sensor has been stored dry or removed from service for more than a week
- Water chemistry has changed dramatically (different source water, seasonal changes)
If you’re in a regulated environment, your calibration schedule should follow your facility’s QA/QC requirements, not just the sensor manufacturer’s recommendation.
Temperature Compensation
Ozone solubility and electrode response both vary with temperature. The O3-100 has a built-in TH10K thermistor that reads water temperature and compensates the ozone measurement automatically.
In automatic mode (the default), the sensor adjusts the O3 reading based on the measured temperature. This works well when the sensor is installed directly in the process water and the temperature sensor is seeing the same water as the electrode.
Manual mode is there for situations where the sensor is in a sample line that’s at a different temperature than the actual process. You set a fixed temperature value (via register 0x0021), and the sensor uses that for compensation instead of the measured temperature. This scenario comes up in cold water treatment plants where the sample line runs through a warm equipment room.
To switch between modes:
- Automatic: Write 0x0001 to register 0x0020
- Manual: Write 0x0000 to register 0x0020, then write your temperature setpoint (multiplied by 10) to register 0x0021
Application-Specific Setup Tips
Water Treatment and Disinfection
In municipal and industrial water treatment, the O3-100 typically monitors residual ozone at the outlet of the contact chamber. This is where you verify that your CT (concentration times time) target is being met.
Placement: Install the flow cell on a sample tap at the contact chamber outlet, after any baffles or mixing zones. The goal is to measure the ozone residual that represents the treated water leaving the chamber, not a spot reading inside the chamber where concentrations vary with proximity to the injection point.
Target concentrations: Most disinfection applications run between 0.1 and 0.4 mg/L residual at the contact chamber outlet. At these low concentrations, every detail of the installation matters. A small air leak in the flow cell, a bit of biofilm on the electrode, or a sample line that’s too long can each pull your reading down by 0.05 mg/L, which is a significant fraction of your target.
Control integration: Connect the O3-100 to your ozone generator controller to create a closed-loop dosing system. The sensor reads residual, the controller compares it to setpoint, and the generator output adjusts. This is far more reliable than fixed-dose operation, especially when organic load varies throughout the day.
For a deeper look at sensor technologies and placement strategies for water treatment, see our dissolved ozone monitoring guide.
Aquaculture and RAS
In recirculating aquaculture systems, ozone is a powerful tool for water quality management, but it requires careful monitoring because ozone is toxic to fish at very low concentrations.
Where to install the O3-100: In the ozone contact chamber or immediately downstream. This sensor tells you whether your ozone generator is producing enough to treat the water. Target residuals in the contact chamber are typically 0.1 to 0.4 mg/L for general organic removal and pathogen control.
The safety layer: The O3-100 monitors the ozone treatment side of your system. For fish safety, you also need an ORP sensor in or near the fish tank. ORP above 350 mV in the culture tank means ozone residual is reaching the fish, and that’s an emergency. Your control system should cut the ozone generator immediately if tank ORP exceeds your safety threshold.
Why both sensors matter: We’ve seen operators try to use only an ORP sensor for everything. ORP works fine for safety shutdowns and general trending, but it doesn’t tell you the actual ozone concentration. Without the O3-100 at the contact chamber, you don’t know if your target CT is being achieved, and you can’t tell whether a low ORP reading means “healthy water” or “the ozone generator failed three hours ago.”
For complete coverage of RAS monitoring, including dissolved oxygen, pH, ammonia, and how ozone fits into the bigger picture, see our RAS water quality monitoring guide.
Food and Beverage Processing
Ozone is used in food processing for wash water disinfection, surface sanitation, and as a chemical-free alternative to chlorine in produce washing. The FDA has approved ozone as a direct food contact antimicrobial, which has driven adoption in recent years.
Typical setup: The O3-100 monitors ozone concentration in the wash water tank or in the recirculation line after the ozone injection point. Concentrations vary by application: 0.5 to 2.0 mg/L for produce washing, 1 to 5 mg/L for equipment sanitization, higher for specialty applications.
HACCP documentation: Many food processing facilities need to log ozone concentrations as part of their HACCP plan. The O3-100’s Modbus output makes it straightforward to log data at whatever interval your food safety plan requires. Connect it to an Omni Exodus controller for cloud-based logging with timestamped records that your auditors can review.
Cooling Towers and Industrial Process Water
Ozone is gaining ground as a biocide replacement in cooling tower water treatment. It controls biofilm, Legionella, and algae without the chemical handling and discharge concerns of traditional biocides.
Installation consideration: Cooling tower water is often warm (30 to 45°C) and can carry significant mineral scale and biofilm. The A580 flow cell helps protect the sensor, but expect to clean the electrode more frequently than in clean water applications. Monthly cleaning is a reasonable starting point; adjust based on what you see on the electrode surface.
Monitoring approach: Many cooling tower operators use ORP as the primary control signal (targeting 600 to 700 mV) and add the O3-100 for periodic verification and troubleshooting. This is a cost-effective approach since ORP sensors are more rugged in this environment, while the ozone probe provides the ground-truth concentration when you need it.
Maintenance and Troubleshooting
Routine Maintenance Schedule
| Frequency | Task |
|---|---|
| Weekly | Visual inspection of flow cell and sample line. Check flow rate is within 0.5 to 2.0 L/min |
| Monthly | Clean electrode surface with soft cloth and warm water. Inspect sample tubing for discoloration or degradation |
| Quarterly | Spot-check reading against indigo test kit or reference analyzer. Recalibrate if deviation exceeds 10% |
| Annually | Evaluate electrode condition. Plan replacement if response time has increased or if calibration slope has drifted outside the 30% to 300% range |
Common Problems and Fixes
Readings are lower than expected: This is the most frequent complaint, and the cause is almost always the installation, not the sensor. Check for: PVC or rubber in the sample path, sample line too long, air leak in the flow cell, low flow rate through the cell, or biofilm on the electrode.
Readings are noisy or erratic: Usually caused by air bubbles on the electrode surface or turbulence in the flow cell. Verify the flow cell is oriented vertically with upward flow. Reduce flow rate if it’s above 2 L/min. You can also increase the filter coefficient via register 0x002D (range 1 to 16, higher values smooth more aggressively but increase response time).
No Modbus response: Check the basics first. Is the sensor powered? (12 to 24V DC on the red and black wires.) Are the RS485 wires correct? (Green to A, white to B. If that doesn’t work, swap them. A/B labeling is not standardized across manufacturers.) Verify your master software is set to 9600 baud, 8-N-1, address 1. If you have multiple sensors on the bus, try disconnecting all but one.
Calibration fails with status 3 (signal unstable): The ozone concentration is changing too fast during calibration, or the electrode needs cleaning. Stabilize the standard solution, make sure the flow is steady, wait a full 2 to 3 minutes, and try again.
Calibration fails with status 4 (slope out of limits): The electrode response has degraded beyond the allowable compensation range. This usually means the electrode is nearing end of life. Clean it thoroughly and try once more. If it still fails, the electrode needs replacement.
Electrode Replacement
The electrode has a typical lifespan of about 12 months, though this varies with water conditions. Aggressive water chemistry, high ozone concentrations, and high temperatures shorten electrode life. Clean water at moderate temperatures can extend it well beyond 12 months.
Signs that replacement is approaching:
- Response time increases noticeably (taking more than 2 minutes to stabilize)
- Calibration slope drifts outside the normal range and needs frequent adjustment
- Readings become noisy even after cleaning and flow rate optimization
- The electrode surface shows visible pitting or discoloration that cleaning doesn’t resolve
Connecting to IoT and Cloud Monitoring
The O3-100’s RS485 Modbus output connects directly to the Omni Genesis (4-port) or Omni Exodus (6-port) IoT controllers. Once connected, your dissolved ozone data is available on the Agrinovo cloud dashboard with:
- Real-time display of ozone concentration and temperature
- Historical trending to spot patterns, drift, and correlations with other parameters
- Configurable alerts for high, low, and rate-of-change conditions
- Data export for compliance documentation and reporting
For multi-sensor installations, the RS485 bus supports up to 32 sensors on a single cable run. Assign each sensor a unique address (1 to 247) and your controller polls them sequentially. A typical poll cycle for 4 to 6 sensors takes under 2 seconds, so the data is effectively real-time for process control purposes.
The Modbus register map is straightforward. Most operators only need three registers: O3 concentration (0x0000), electrode signal (0x0004), and temperature (0x0008). The electrode signal in millivolts is useful for diagnostics; trending it over time helps predict when calibration or electrode replacement is needed, even before the ozone reading shows obvious drift.
Wrapping Up
The O3-100 is a capable sensor that will give you reliable dissolved ozone measurements for years if you install it correctly and maintain it on schedule. The two things that make the biggest difference in real-world performance are material compatibility (use PTFE for everything in the sample path) and flow cell installation (gas-tight, vertical, proper flow rate).
If you’re building a new ozone monitoring system or upgrading from manual spot checks to continuous monitoring, the combination of an O3-100 at the contact chamber and an ORP probe at the point of use gives you both the treatment verification and the safety monitoring you need. Connect them to an IoT controller and you have a complete picture of your ozone process, accessible from anywhere, with automated alerts that catch problems before they become expensive.
For questions about sensor selection, system design, or integration with your specific setup, contact us and we’ll help you figure out the right configuration.