The first time one of our clients failed a food safety audit, it was not because of a temperature violation. The freezer was fine. The walk-in was fine. The hot line was fine. They failed because the paper log books showed 41.0 °F at the top of every hour, on every shelf, for three months straight. The inspector pointed at the logs and said, “I do not believe these.”
Then she pulled the sensor from the back of the walk-in, recorded a reading, and spent the next two hours documenting a pattern of falsified records that turned a routine inspection into a corrective action plan, a mandatory re-inspection, and eventually a sizable fine.
Nothing was actually wrong with the food. Temperatures had almost certainly been fine. But the records, filled out by three different shift leads who each had a blank book and a pen, did not prove it. And “prove it” is the entire job of a food safety temperature log.
This guide covers how to replace manual paper logs with automated temperature monitoring: what the regulations actually require, what accuracy you need from the sensors, where to place them, how to set up alerts, and what an auditor expects to see when they ask for your records.
What the Regulations Actually Require
Temperature logs are required under some form of food safety regulation in nearly every country that operates commercial food service. The specific requirements vary, but the common thread is documented evidence that food was held at safe temperatures through the entire time it was under your control.
In the United States, the FDA Food Code (adopted in some form by most state and local jurisdictions) requires that time and temperature controls be monitored for potentially hazardous foods, with records maintained and available on request. HACCP-certified operations follow stricter rules written into their individual HACCP plans. Shellfish programs, USDA meat and poultry operations, and FSMA Rule 204 traceability add further layers.
In the European Union, HACCP is mandatory for all food businesses under Regulation (EC) No 852/2004, with documentation requirements that local competent authorities enforce. Commercial operations typically keep records for 2 years or more.
Most jurisdictions accept either of two monitoring approaches:
Periodic manual monitoring. Someone walks around with a thermometer, records readings every 2-4 hours, and signs off. Logs are kept on paper or in a spreadsheet. Simple, low-effort to start, legally valid, and almost always inadequate when something goes wrong.
Continuous electronic monitoring. Sensors record temperatures every 1-15 minutes automatically. Data is stored in a tamper-evident system. Alerts fire when readings exceed safe thresholds. Records are produced on request for inspections.
Both approaches are legal. Only one survives scrutiny when there is an actual problem.
Why Manual Paper Logs Fail in Audits
We have seen the same three patterns in paper logs over and over, and every inspector sees the same three patterns.
Repetitive entries. A walk-in does not actually read exactly 38 °F at 8 am, 10 am, 12 pm, 2 pm, 4 pm, and 6 pm for 60 days straight. Real fridges cycle. They warm up during lunch rushes when the door is open constantly. They dip cooler overnight when the compressor catches up. A log with no variation is a log that was backfilled.
Missing entries that happen to coincide with events. The log is blank from 2 pm to 6 pm on the day the compressor failed. There are no readings during the four-hour window when an inspector later discovered spoiled product. Coincidence is a hard sell.
Initials that tell a story. The opening manager signs the 6 am entry. The closing manager signs the 10 pm entry. Every entry in between was signed by one of them, in advance or after the fact, because nobody was actually checking every two hours through the middle of the day.
A good inspector does not have to prove that logs are falsified. They only have to doubt them. Once credibility is gone, the rest of the inspection becomes adversarial. An automated log does not have this problem: either the sensor was reading or it was not, and if it was reading, the record is what the sensor saw.
What an Automated Temperature Monitoring System Looks Like
The modern version of “temperature logging” is four components: sensors, a data logger or controller, cloud storage, and alerting.
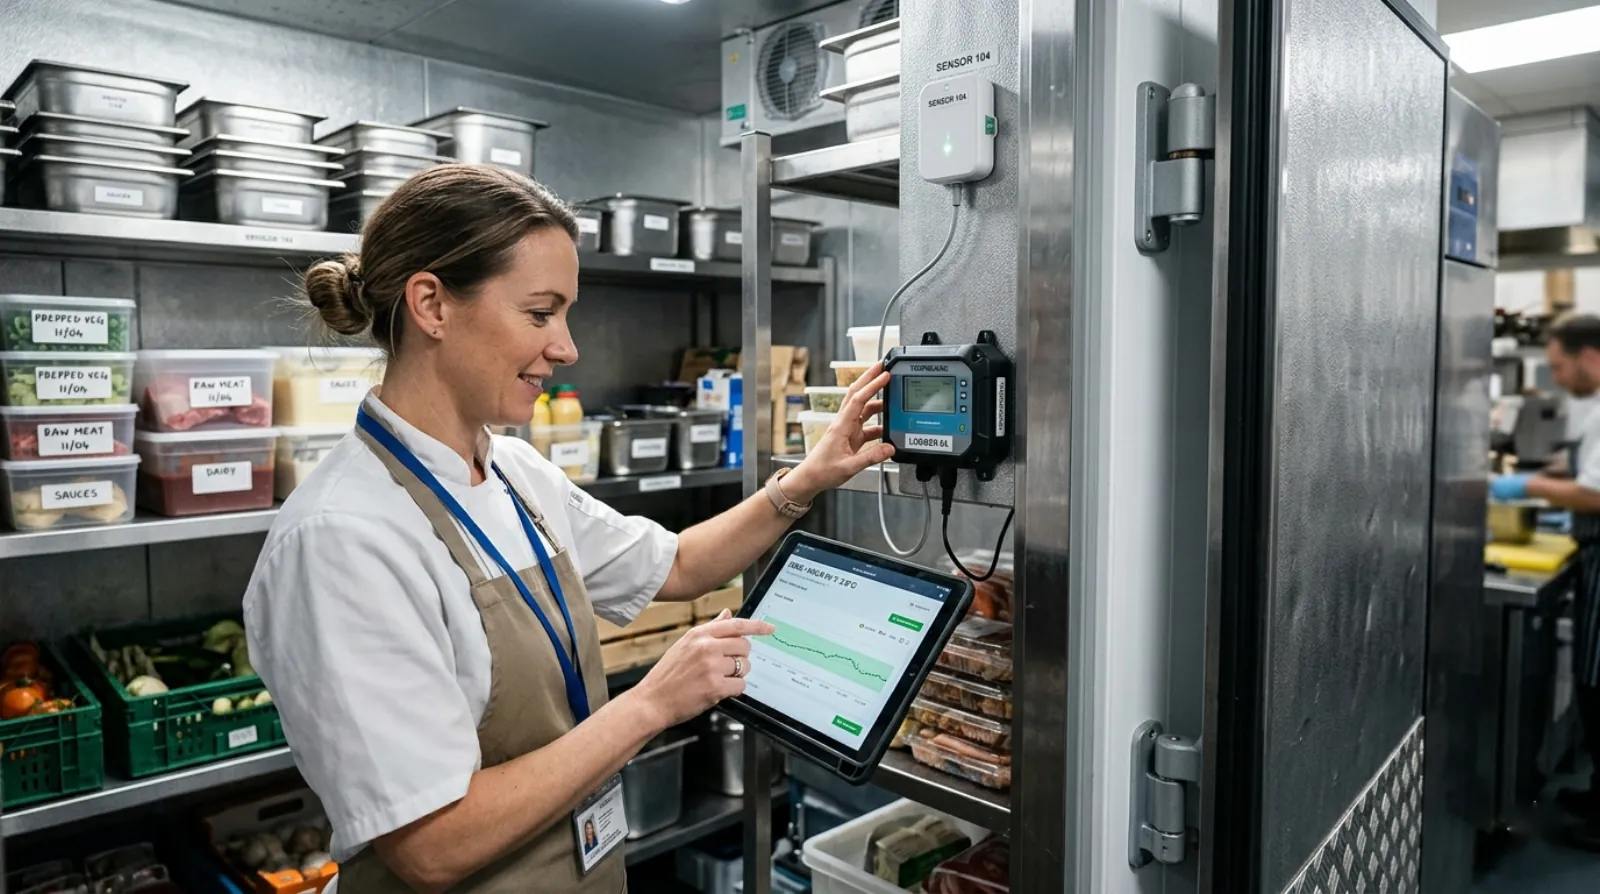
Sensors
Small wireless or wired probes that measure temperature (and often humidity) at a specific location. For cold storage and hot holding, a digital temperature sensor with ±0.5 °C accuracy is sufficient. The SHT30 temperature and humidity sensor is a typical example: ±0.3 °C accuracy, I2C digital output, suitable for walk-in coolers and prep areas in the 2 to 40 °C range. For freezer monitoring at -18 °C and below, use a sensor rated for that range (a standard PT1000 RTD is the industry default).
For cook temperatures, use a dedicated probe thermometer (handheld or bench) for the CCP verification step. Continuous sensors are for ambient holding, not for verifying that a chicken breast actually hit 74 °C in the middle.
Data Logger or Controller
The sensors connect to a device that reads them, buffers readings locally, and transmits data upstream. In a restaurant or single-kitchen operation, this is typically one logger that reads 4-12 sensors scattered across the kitchen. In a commissary or distribution center, you might have several loggers networked together.
For retail food service, either a dedicated cellular logger or a controller works. Controllers have the advantage of being able to trigger local alerts (buzzer, flashing light) when a reading goes out of range, without depending on cellular or WiFi connectivity to reach a cloud service.
Cloud Storage
Readings get uploaded to a cloud platform where they are stored, visualised as graphs, and made available for export. For audit readiness, the key requirements are:
- Every reading has a timestamp, sensor ID, location label, and the actual value
- The record is tamper-evident (edits create new entries rather than overwriting)
- Records can be exported as PDF or CSV on demand
- Retention meets or exceeds local requirements (typically 2 years)
- Access is controlled so that only authorised staff can modify system settings
Alerting
The sensor catches the temperature excursion. The cloud platform notices it. Someone needs to be told. Good alerting systems send notifications via SMS, email, and push notification simultaneously, escalate to secondary contacts if the primary does not acknowledge within a set time, and log both the alert and the acknowledgement.
The alert threshold is not the regulatory limit. If your walk-in must stay below 5 °C, your alert should fire at 4 °C so you have time to respond before you cross the line. Similarly, alerts should fire on duration, not just threshold: a reading of 6 °C for two minutes when the door was open is normal; a reading of 6 °C for 45 minutes is a failing compressor.
Where to Place Sensors
Placement matters as much as sensor quality. The wrong spot gives you accurate readings that do not reflect product conditions.
Walk-In Coolers and Freezers
Install the sensor near the centre of the walk-in, at product height (usually middle shelf), away from the evaporator and away from the door. The worst spots are directly under the evaporator (reads too cold), directly in the door path (reads warm every time someone walks in), and on the top shelf in a tall walk-in (reads warmer than the bulk of product).
Use a sensor with a short cable that puts the sensing element away from the mounting surface. A sensor that sits flush against a metal wall reads the wall, not the air.
Reach-In Coolers and Prep Tables
Sensors go on the top shelf, not the bottom. Most reach-ins are coldest at the bottom and warmest at the top. If your sensor is on the bottom shelf, you will see satisfying cold numbers while the top of the unit runs 3-4 °C warmer.
For prep tables with product inserts on top, add a second sensor in the well itself. These units are notoriously variable between the chilled base and the open-top inserts that warm up during service.
Hot Holding
Sensors in hot holding equipment need to handle 70-90 °C continuously. Standard temperature sensors survive this, but cables and mounting matter. Use high-temp cable, mount the sensor away from direct burner or steam contact, and calibrate at operational temperature.
Place the sensor in the coldest part of the holding unit. Hot holding failures are almost always in corners far from heating elements. Your goal is to catch the first food that drops below safe holding temperature, not to reassure yourself that the hottest part of the unit is hot.
Prep Areas and Ambient Rooms
Ambient temperature in prep areas is a secondary concern in most HACCP plans but matters for specific foods (cut leafy greens, fish, meat being portioned). Place a sensor at standard prep-table height, away from direct HVAC vents, in the area where most product sits out during service.
Alert Thresholds and Response Workflows
An alert that nobody responds to is worse than no alert. When you set up a system, define thresholds and the response process together.
Typical threshold setup for a restaurant walk-in cooler (target below 5 °C):
- Warning at 4 °C, notification to shift manager only, no urgency, log the event
- Alert at 5 °C for 15 minutes, SMS and email to shift manager, acknowledgement required within 15 minutes
- Critical at 7 °C for 30 minutes, escalation to general manager and owner, food safety review required
The point of escalating thresholds is to give staff a chance to catch a door that was left open before it becomes an actual compliance event. Single-threshold alerts either fire too often (nuisance) or only fire after food is already compromised.
Response workflow should cover:
- Who is notified, in what order, by what channel
- Who can acknowledge and clear an alert
- What actions are required when an alert fires (close door, move product, call HVAC tech, document the event)
- Where the response is recorded for the audit trail
Integration with Existing Systems
A temperature monitoring system is more useful when it talks to other systems.
Building management systems (BMS) in larger facilities integrate temperature data into the same dashboards that track HVAC, lighting, and security. Most cloud temperature platforms export via REST API or Modbus TCP for BMS integration.
Maintenance management benefits from tying temperature excursions to service tickets. A compressor that is cycling poorly will show up as a climbing baseline temperature long before it fails completely.
POS and inventory systems occasionally pull temperature data to correlate product movement with cold chain integrity.
For most single-location operations, integration is not necessary. For multi-unit operators and commissaries, it is worth the engineering time to consolidate monitoring into one platform.
What Not to Skimp On
A quick list of things we see people try to save money on that come back to bite them.
Sensor accuracy. A ±2 °C sensor on a walk-in that must stay below 5 °C means your alert threshold has to be set at 3 °C to avoid missed violations. That will fire dozens of nuisance alerts per day. Invest in a tighter ±0.5 °C sensor instead.
Connectivity. A logger that uploads data once a day is useless for real-time alerting. Either the sensor catches a door-left-open event in the first five minutes or it will not catch it in time to matter.
Local alerting. Cloud-based alerts go through cellular or WiFi. Both can fail. A local buzzer or indicator light at the equipment itself adds no cost and provides a second channel.
Audit export. If you cannot produce a clean PDF of a month of readings when an inspector asks, the entire system has failed its job. Test the export function before you need it.
Staff training. Automated systems do not run themselves. If your kitchen staff have no idea what the alerts mean or how to respond, you have a logging system, not a monitoring system.
Picking Your First System
For a single-location restaurant or small food service operation, start with one controller reading four to eight sensors: walk-in cooler, freezer, two or three reach-ins, and one hot-holding unit. Cellular or WiFi backhaul. Cloud platform with PDF export and SMS alerts. Plan for a practical hardware investment plus a modest monthly fee for connectivity and cloud access.
For multi-unit operators, plan for central consolidation from day one. The cost of retrofitting a shared dashboard across ten locations is much higher than setting it up correctly at the start.
For commissaries and distribution centers, you are already running a more complex environment and likely have a BMS to integrate with. Specify the monitoring system with BMS integration in mind and include local alerting at each piece of equipment.
If the sensors you need span a wider environmental range (freezer plus ambient plus hot holding), you may need multiple sensor types on the same system. Check that your logger or controller supports both digital (I2C/RS485) and analog (4-20 mA or PT1000) inputs, because a single-input-type device will box you in later.
The Short Version
Manual paper temperature logs are still legal. They are not credible. Any operation that is serious about audit readiness, food safety, and staff efficiency should move to automated logging. The hardware cost is a fraction of one failed inspection. The labour savings alone typically pay for the system in under a year.
Pick sensors accurate enough to give you margin above regulatory limits. Place them where product lives, not where airflow feels cold. Set escalating alert thresholds that give your team a chance to catch problems before they become violations. And make sure the audit export works before an inspector asks for it.